
Business
Hanging Hardie Siding: Complete 2026 Guide to Installation, Tools, Costs, and Best Practices

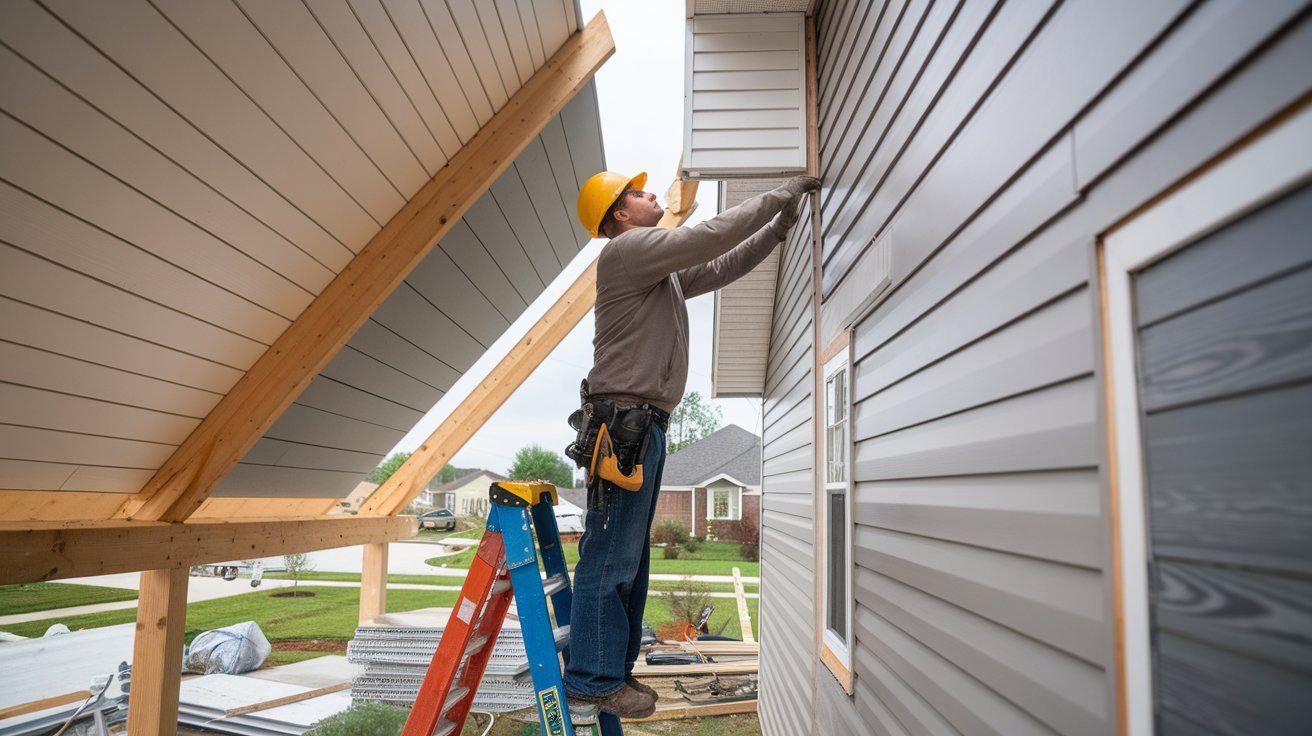
Hanging Hardie siding is a popular way to give a home a durable, attractive exterior while achieving the appearance of traditional wood siding. Commonly associated with James Hardie fiber-cement siding, the material is designed to withstand demanding exterior conditions while offering a wide range of colors, profiles, and architectural styles.
In 2026, Hardie siding continues to be available in several formats, including Hardie Plank lap siding, Hardie Panel, Hardie Shingle, and Hardie Artisan siding. Proper installation is essential because fiber cement is a rigid material that must be supported, fastened, flashed, and spaced correctly. James Hardie recommends using approved fasteners and following the installation instructions specific to the product and region.
Whether we are replacing old siding, constructing a new home, or planning an exterior renovation, understanding how Hardie siding is hung helps us make better decisions about preparation, fastening, moisture management, cutting, finishing, and long-term maintenance.
What Is Hanging Hardie Siding?
The phrase hanging Hardie siding generally refers to installing fiber-cement siding panels or planks onto the exterior walls of a house. Unlike lightweight vinyl siding, Hardie fiber cement is relatively rigid and requires appropriate handling, support, and fastening.
For traditional Hardie Plank lap siding, installation normally begins with a properly prepared wall assembly, weather-resistive barrier and flashing where required, followed by a starter strip and successive horizontal courses. James Hardie specifically notes that Hardie Plank lap siding requires a starter strip beneath the first course. A starter strip can be made by ripping a suitable piece of Hardie Plank into approximately 1-1/4-inch strips, or an acceptable third-party starter strip may be used.
The exact installation details depend on the product. Hardie Panel, Shingle, Artisan, and lap siding each have their own requirements. We should therefore avoid treating one installation procedure as universal for every Hardie product.
Proper installation is important not only for appearance but also for water management, wind resistance, structural performance, and product durability.
Preparing the Wall Before Hanging Hardie Siding
Good siding installation starts long before the first plank is attached. The exterior wall should be inspected for structural damage, moisture intrusion, rot, uneven surfaces, and deteriorated sheathing. Existing problems should be corrected before new siding covers the wall.
The wall assembly should include the required weather-resistive barrier (WRB), flashing, drainage provisions, and trim details according to the applicable James Hardie installation instructions and local building code. James Hardie maintains product-specific technical documents covering clearance requirements, installation details, and other construction information.
We should also establish accurate reference lines before installing the first course. A level starting point is extremely important because small errors at the bottom of the wall can become increasingly obvious as additional rows are installed.
Windows, doors, corners, roof intersections, decks, and other penetrations deserve particular attention. These locations require proper flashing and clearance details so water does not become trapped behind the siding.
The goal is to create a wall assembly in which water is managed safely rather than relying on caulk alone to prevent moisture intrusion.
How to Hang Hardie Plank Siding
Once the wall has been prepared, we can begin installing the lap siding. The basic process involves establishing the starter strip, installing the first course, maintaining the specified exposure, fastening each plank correctly, and staggering joints as the installation progresses.
For walls longer than the available siding length, multiple pieces may need to be joined. James Hardie’s installation guidance recommends staggering butt joints between successive courses to produce a better appearance and avoid creating an obvious vertical pattern. For 16-inch on-center framing, adjacent butt joints should generally be separated by at least two stud bays; for 24-inch on-center framing, the guidance specifies one bay.
Fastener placement is another critical consideration. James Hardie states that Hardie siding should be installed with approved fasteners, including corrosion-resistant, galvanized, or stainless-steel fasteners, and that spacing should follow the applicable wind-load tables.
James Hardie generally recommends blind nailing for an unobtrusive appearance, although other methods, including face nailing, may be required in certain applications or high-wind areas.
We should never simply copy nail spacing from another project because the correct requirements can vary according to the specific siding product, framing, wind exposure, and local code.
Tools and Safety for Hanging Hardie Siding
Installing fiber-cement siding requires more specialized preparation than many lightweight siding materials. Typical tools may include a measuring tape, level, chalk line, siding gauge, fastening equipment, cutting equipment, drill, utility tools, ladders or scaffolding, and appropriate personal protective equipment.
Cutting Hardie siding requires particular attention to dust control. Fiber-cement products can generate respirable crystalline silica dust when cut, so installers should follow the manufacturer’s recommended cutting procedures and applicable workplace safety requirements. James Hardie provides guidance intended to reduce dust generated during cutting.
We should also use proper lifting and handling techniques because siding boards can be heavy and rigid. Working from ladders or elevated platforms introduces additional fall hazards, making appropriate equipment and safe work practices essential.
For homeowners without experience handling fiber cement, hiring a qualified siding contractor can be safer and more reliable than attempting a complete exterior installation independently. James Hardie itself recommends that full siding projects be undertaken by siding professionals familiar with fiber-cement installation.
Moisture Management, Trim, and Clearance
One of the most important aspects of hanging Hardie siding is understanding that the siding itself is only one part of the exterior wall system. Flashing, WRB, trim, drainage, and clearances work together to protect the structure.
At corners, windows, doors, and other transitions, installers must follow the applicable product instructions rather than improvising details. James Hardie’s current technical resources provide installation documentation for individual products and emphasize correct clearance and installation procedures.
In 2026, James Hardie is also promoting its Trim-Over™ Installation Method, an alternative approach in which siding is installed before certain trim components. The method uses score-and-snap cutting and allows trim to cover cut edges, potentially reducing caulking and improving installation efficiency. James Hardie reports that installation studies demonstrated an approximately 30% increase in average installation rate compared with butt-to installation.
However, the Trim-Over method is not a reason to ignore standard installation requirements. James Hardie specifically states that installers should follow its installation instructions and local building codes, including appropriate flashing over the WRB at corners.
Hanging Hardie Siding Cost in 2026
The cost of hanging Hardie siding depends on several variables, including house size, siding profile, labor rates, wall height, existing siding removal, sheathing repairs, trim requirements, flashing, insulation or WRB work, accessibility, and geographic location.
A straightforward replacement project can be considerably less complicated than a complete exterior renovation in which the old siding is removed and underlying moisture damage is discovered.
The overall budget may include:
- Hardie siding materials
- Starter strips and accessories
- Trim and corner boards
- Fasteners
- WRB and flashing
- Labor
- Old siding removal
- Disposal fees
- Wall repairs
- Painting or touch-up work
- Scaffolding or specialized access
- Permits where applicable
Hardie Plank products currently advertise a 30-year non-prorated, transferable substrate warranty, while ColorPlus® finishes are designed to provide a durable factory-applied finish. Exact warranty terms vary by product and should be reviewed before purchase.
Rather than choosing a contractor solely on the lowest estimate, we should compare detailed quotations that specify materials, preparation, installation method, flashing, trim, removal, cleanup, warranty, and repairs.
Hardie Siding Maintenance and Common Installation Mistakes
One major advantage of fiber-cement siding is its relatively low-maintenance nature, but correct installation remains essential. Regular inspections can help identify damaged boards, failed sealant, clearance problems, or areas where water may be entering the wall assembly.
Common installation mistakes include incorrect nail placement, insufficient flashing, improper starter-strip installation, inadequate clearances, poorly staggered joints, excessive reliance on caulk, and failure to follow product-specific instructions.
We should also avoid assuming that every Hardie product can be installed using the same technique. Hardie Plank, Hardie Shingle, Hardie Panel, and Artisan siding have different installation requirements. James Hardie’s official installation resources provide separate guidance for these products.
Proper maintenance is relatively straightforward: inspect the exterior periodically, keep drainage paths clear, check vulnerable transitions, and address damage before it spreads.
Final Verdict: Is Hanging Hardie Siding Worth It in 2026?
Hanging Hardie siding can be an excellent exterior renovation choice when durability, appearance, fire performance, and long-term value are priorities. James Hardie’s fiber-cement products are available in numerous styles, including traditional lap siding and more architectural profiles, allowing us to create everything from a classic exterior to a modern contemporary design. James Hardie states that its siding complies with ASTM E136 as a noncombustible cladding, although the fire performance does not extend to applied paints or coatings.
The most important factor is installation quality. Even premium siding can perform poorly if the wall is inadequately prepared, flashing is missing, fasteners are incorrectly placed, or clearances are ignored.
For 2026 projects, the best approach is to select the correct Hardie product, follow its current installation documentation, use appropriate fasteners and moisture-management details, maintain proper clearances, and work with an experienced fiber-cement siding professional when the project exceeds basic DIY capabilities.
When installed correctly, Hardie siding can provide a durable, attractive, low-maintenance exterior that combines modern performance with the appearance homeowners want.
Frequently Asked Questions
Can we hang Hardie siding ourselves?
Some experienced homeowners may be able to handle portions of a siding project, but James Hardie recommends professional installation for complete siding projects because fiber cement requires specialized handling and installation knowledge.
How long does it take to hang Hardie siding?
James Hardie says a typical average-sized home generally takes approximately seven to 14 days, depending on the home’s size and whether repairs are required before installation.
What fasteners should be used for Hardie siding?
James Hardie specifies approved fasteners and says they should be corrosion-resistant, galvanized, or stainless steel, with spacing determined according to applicable requirements.
Does Hardie siding need a starter strip?
For Hardie Plank lap siding, a starter strip is required beneath the first course.
Is Hardie siding fire resistant?
James Hardie states that its siding complies with ASTM E136 as a noncombustible cladding. However, the fire performance of the fiber-cement product does not automatically apply to paints or coatings placed over it.
What is the Trim-Over method?
The Hardie Trim-Over™ method installs siding before certain trim components and uses trim to cover cut edges, reducing the amount of caulking required. James Hardie reports increased installation efficiency with this method.
Business
Post LetsBuildUp.org: A Complete 2026 Guide to Community-Driven Content and Digital Engagement
The internet has become a powerful space for collaboration, education, and community engagement. Among the many platforms that encourage meaningful conversations and information sharing, Post LetsBuildUp.org has attracted attention from users looking for community-focused content and opportunities to participate in discussions. Whether you are searching for educational resources, social initiatives, or collaborative projects, understanding how Post LetsBuildUp.org works can help you make the most of its features.
In this comprehensive 2026 guide, we explore what Post LetsBuildUp.org is, its key features, potential benefits, content categories, publishing practices, and why community-driven platforms continue to grow in popularity.
What Is Post LetsBuildUp.org?
Post LetsBuildUp.org refers to content published on the LetsBuildUp.org platform, where contributors share articles, updates, opinions, educational materials, announcements, and community-focused information. The platform emphasizes collaboration, constructive discussions, and the sharing of knowledge that benefits readers.
Rather than focusing solely on entertainment, many community platforms encourage users to create valuable posts that educate, inspire, and inform. This approach helps build trust while creating a growing library of useful information for visitors.
Common types of posts may include:
- Educational articles
- Community announcements
- Volunteer opportunities
- Social awareness campaigns
- Project updates
- Opinion pieces
- Local initiatives
- Success stories
- Resource guides
These content categories help readers stay informed while encouraging participation and collaboration.
Why Community Platforms Like LetsBuildUp.org Matter
Community-based websites have become increasingly important because they connect people around shared goals and interests. Instead of simply consuming information, users can contribute ideas, ask questions, and support meaningful initiatives.
Some of the biggest advantages include:
Knowledge Sharing
Contributors publish detailed articles that help others learn new skills, discover useful resources, and better understand important topics.
Community Collaboration
Interactive discussions encourage members to exchange ideas, solve problems together, and build stronger relationships.
Support for Local and Global Initiatives
Community platforms often highlight nonprofit organizations, educational programs, environmental campaigns, and volunteer opportunities that make a positive impact.
Reliable Information Exchange
Well-written posts can serve as practical references, helping readers make informed decisions based on clear and organized information.
Key Features of Post LetsBuildUp.org
One reason community-focused platforms continue to grow is the variety of features they provide for both readers and contributors.
Easy Content Publishing
Users can publish informative posts covering a wide range of subjects. Clear formatting options make articles easier to read and navigate.
Community Interaction
Readers often engage through comments, discussions, and constructive feedback, creating an active learning environment.
Educational Resources
Many community platforms organize articles into categories, making it simple to locate tutorials, guides, research, and practical advice.
Accessible Design
Modern websites prioritize responsive layouts that work smoothly on smartphones, tablets, and desktop computers, ensuring a consistent experience across devices.
Regular Updates
Frequently updated content keeps readers informed about ongoing projects, events, and newly published resources.
Best Practices for Creating High-Quality Posts
Publishing valuable content requires more than simply writing a few paragraphs. Successful posts are informative, organized, and designed with readers in mind.
Choose a Clear Topic
Focus on one subject and explain it thoroughly. Articles that answer common questions are more useful to readers.
Write an Engaging Introduction
A strong introduction explains the purpose of the article and encourages visitors to continue reading.
Use Descriptive Headings
Organized headings improve readability and allow readers to quickly find the information they need.
Include Accurate Information
Reliable facts and carefully researched content help establish credibility and trust.
Maintain Readability
Short paragraphs, bullet points, and logical organization improve the overall reading experience.
Update Older Content
Refreshing articles with current information ensures they remain relevant throughout 2026 and beyond.
Benefits of Reading and Contributing to LetsBuildUp.org
Participating in community-driven platforms offers advantages for both contributors and readers.
For Readers
Readers gain access to:
- Helpful educational content
- Community news
- Practical guides
- Expert opinions
- Project updates
- Useful resources
- Learning opportunities
For Contributors
Publishing quality articles can help individuals:
- Share expertise
- Build professional credibility
- Support community initiatives
- Encourage meaningful discussions
- Expand their audience
- Develop writing skills
- Promote positive engagement
By consistently creating valuable content, contributors can establish themselves as trusted voices within their communities.
The Future of Community Publishing in 2026
Digital communities continue evolving as technology introduces new ways to collaborate and share information.
Several trends are expected to shape platforms like LetsBuildUp.org:
Artificial Intelligence Assistance
AI-powered writing and editing tools help contributors improve grammar, readability, and organization while maintaining originality.
Enhanced Mobile Experiences
With mobile traffic continuing to grow, websites are increasingly optimized for fast loading and intuitive navigation on smartphones.
Interactive Multimedia Content
Modern articles often combine written content with images, videos, infographics, and downloadable resources to create more engaging experiences.
Greater Community Participation
Improved discussion tools, live events, and collaborative projects encourage users to interact more actively with published content.
Accessibility Improvements
Inclusive design practices ensure that digital resources remain accessible to users with different needs and devices.
These developments strengthen online communities by making information easier to access and contribute.
Conclusion
Post LetsBuildUp.org represents the growing importance of community-driven publishing, where meaningful content, collaboration, and education come together to create valuable online experiences. By offering informative articles, encouraging thoughtful discussions, and supporting initiatives that benefit communities, platforms like LetsBuildUp.org demonstrate how digital spaces can foster learning and positive engagement.
Whether you are a reader looking for reliable information or a contributor eager to share knowledge, participating in community-focused platforms can help build stronger connections, promote constructive conversations, and inspire meaningful change. As digital publishing continues to evolve throughout 2026, quality content and active community participation will remain at the heart of successful online platforms.
Frequently Asked Questions (FAQ)
What is Post LetsBuildUp.org?
Post LetsBuildUp.org refers to articles, updates, and community-focused content published on the LetsBuildUp.org platform.
Who can benefit from reading LetsBuildUp.org?
Students, educators, volunteers, nonprofit organizations, professionals, and community members can all benefit from the educational and collaborative content available on the platform.
What types of content are commonly published?
Common content includes educational guides, community news, project updates, opinion articles, volunteer opportunities, and informative resources.
Why is community-driven publishing important?
It encourages collaboration, knowledge sharing, public engagement, and the exchange of ideas that support personal and community growth.
How can contributors create better posts?
By choosing relevant topics, writing clearly, organizing content with headings, providing accurate information, and updating articles regularly, contributors can create valuable resources for readers.
What is the future of community publishing?
The future includes AI-assisted writing, enhanced mobile accessibility, interactive multimedia, stronger community participation, and improved digital experiences that make information more engaging and accessible.
Business
TravelTweaks Airline Discount Code (2026): How to Find the Best Travel Savings and Maximize Your Flight Budget

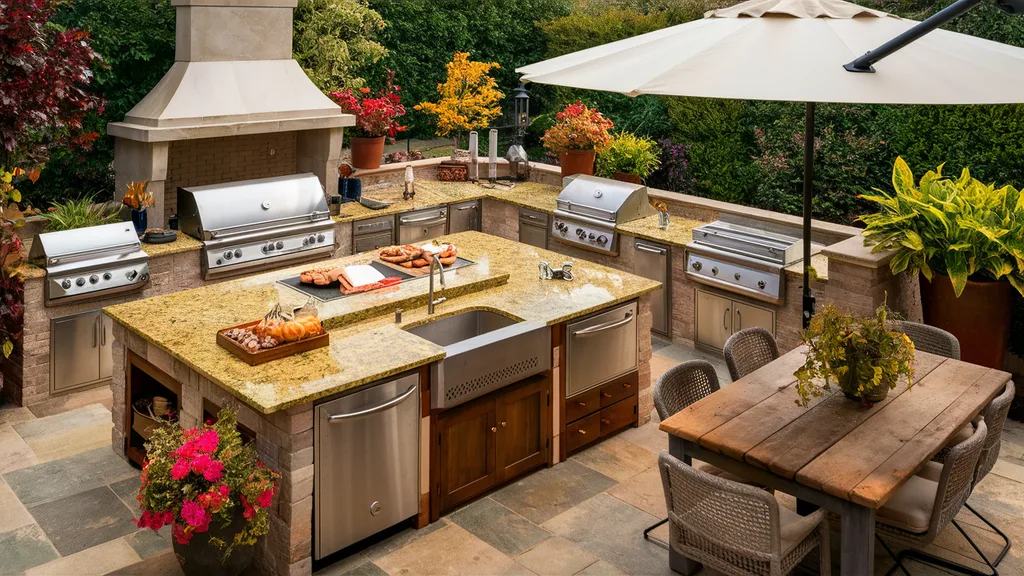
An outdoor kitchen is no longer considered a luxury reserved for large homes or expensive renovations. Today, homeowners of all budgets are discovering creative ways to transform their patios, decks, and backyards into functional cooking and entertaining spaces. Whether you enjoy weekend barbecues, family gatherings, or simply relaxing outdoors, choosing the right easy outdoor kitchen ideas can dramatically improve both your home’s value and your lifestyle.
The best outdoor kitchens don’t have to be oversized or packed with costly appliances. Instead, they focus on smart layouts, durable materials, and practical features that make cooking outside enjoyable throughout the year. Even a compact backyard can accommodate a stylish and efficient cooking area with the right planning.
In this guide, you’ll discover practical outdoor kitchen ideas, budget-friendly design tips, essential features, and creative inspiration to help you build a beautiful outdoor cooking space that fits your needs.
Plan Your Outdoor Kitchen Around Your Available Space
Before purchasing appliances or selecting materials, evaluate the space you have available. A thoughtful layout makes even a small outdoor kitchen feel spacious and functional.
Start by considering:
- Patio size
- Backyard shape
- Existing landscaping
- Distance from the indoor kitchen
- Utility connections
- Seating requirements
If your backyard is compact, a straight-line kitchen placed against a wall or fence often works best. Larger yards provide more flexibility for L-shaped, U-shaped, or island-style layouts.
The goal is to create a natural workflow where cooking, preparation, and serving areas are conveniently connected.
Choose the Right Cooking Equipment
The cooking station is the centerpiece of every outdoor kitchen. Your choice of equipment should match your cooking style rather than simply following trends.
Popular options include:
Gas Grill
A gas grill remains the most common choice because it heats quickly, is easy to control, and requires minimal maintenance.
Charcoal Grill
For those who love smoky flavors, charcoal grilling offers a classic outdoor cooking experience.
Pellet Grill
Pellet grills combine convenience with wood-fired flavor and are excellent for smoking, roasting, and grilling.
Pizza Oven
Outdoor pizza ovens have become increasingly popular for families who enjoy homemade pizza, artisan bread, and roasted vegetables.
Flat Top Grill
A griddle-style cooking surface is ideal for breakfast, burgers, seafood, and stir-fry meals.
Select equipment based on how frequently you’ll use it and the types of meals you enjoy preparing.
Incorporate Smart Storage Solutions
Storage is one of the most overlooked aspects of outdoor kitchen design. Without proper storage, you’ll constantly carry cooking tools back and forth from your indoor kitchen.
Useful storage features include:
- Weather-resistant cabinets
- Stainless steel drawers
- Built-in shelves
- Spice racks
- Trash and recycling compartments
- Hidden propane storage
- Utensil organizers
Keeping frequently used items close to your grill improves convenience and reduces clutter.
Choose materials specifically designed for outdoor environments to withstand rain, humidity, and changing temperatures.
Create Comfortable Dining and Entertainment Areas
An outdoor kitchen becomes much more enjoyable when combined with comfortable seating.
Depending on your available space, consider adding:
Dining Table
Perfect for family dinners and larger gatherings.
Bar Seating
Counter-height stools encourage conversation while meals are being prepared.
Lounge Furniture
Outdoor sofas and chairs create a relaxing atmosphere after cooking.
Fire Pit Seating
A fire pit extends the usability of your outdoor space into cooler evenings.
Mix dining and relaxation areas to create a backyard that functions as both a kitchen and an entertainment destination.
Add Practical Features That Improve Everyday Use
The best outdoor kitchens include features that simplify cooking rather than simply adding visual appeal.
Outdoor Sink
A sink makes food preparation and cleanup significantly easier.
Washing vegetables, cleaning utensils, and rinsing hands can all be done without returning indoors.
Mini Refrigerator
Cold drinks, sauces, and fresh ingredients remain easily accessible during meal preparation.
Counter Space
Ample workspace allows you to prepare food comfortably without overcrowding.
Stone countertops such as granite or concrete are durable choices for outdoor environments.
Lighting
Good lighting extends the usability of your kitchen after sunset.
Consider combining:
- Overhead lighting
- Task lighting
- LED cabinet lighting
- Pathway lighting
- Decorative string lights
Well-planned lighting improves both safety and ambiance.
Choose Durable Outdoor Materials
Outdoor kitchens must withstand weather throughout the year.
Selecting durable materials reduces maintenance and extends the life of your investment.
Popular materials include:
Stainless Steel
Ideal for cabinets, appliances, and storage because it resists rust and corrosion.
Natural Stone
Stone creates a timeless appearance while offering exceptional durability.
Brick
Brick complements both traditional and rustic backyard designs.
Concrete
Concrete countertops provide strength while allowing customized finishes.
Porcelain Tile
Modern porcelain tiles resist moisture, stains, and temperature fluctuations.
Investing in weather-resistant materials reduces long-term repair costs.
Budget-Friendly Outdoor Kitchen Ideas
Creating an outdoor kitchen doesn’t require an enormous budget.
Here are several affordable ideas:
Start Small
Begin with a quality grill and gradually expand your kitchen over time.
Use Portable Furniture
Movable carts provide additional preparation space without permanent construction.
Repurpose Existing Structures
An existing patio or deck can often serve as the foundation for your outdoor kitchen.
DIY Projects
Simple shelving, countertops, and seating areas can often be built at a fraction of professional installation costs.
Focus on Essentials
Prioritize:
- Grill
- Countertop
- Storage
- Seating
Additional features can always be added later.
A phased approach allows homeowners to spread expenses over time while still enjoying their outdoor space.
Decorate Your Outdoor Kitchen for Style and Comfort
Functionality is essential, but thoughtful decoration creates an inviting atmosphere.
Consider incorporating:
Plants
Potted herbs, flowers, and shrubs add color while providing fresh cooking ingredients.
Outdoor Rugs
Weather-resistant rugs define seating areas and add warmth.
Decorative Lighting
Lanterns and string lights create a welcoming evening ambiance.
Cushions and Pillows
Outdoor fabrics provide comfort while introducing texture and color.
Shade Structures
Pergolas, umbrellas, or retractable awnings improve comfort during sunny afternoons.
Decor should complement your home’s architectural style while remaining practical for outdoor use.
Common Mistakes to Avoid
Planning carefully helps prevent costly mistakes.
Avoid these common issues:
Ignoring Workflow
Place cooking, preparation, and serving areas close together.
Choosing Indoor Materials
Materials designed for indoor use often deteriorate quickly outdoors.
Insufficient Counter Space
Food preparation requires more workspace than many homeowners initially expect.
Poor Ventilation
Covered outdoor kitchens require proper airflow around grills and cooking appliances.
Inadequate Lighting
Cooking after dark becomes difficult without sufficient illumination.
Addressing these considerations during the planning stage improves long-term satisfaction.
Maintenance Tips for Long-Lasting Performance
Regular maintenance keeps your outdoor kitchen looking and functioning like new.
Simple habits include:
- Clean grills after each use.
- Wipe countertops regularly.
- Cover appliances during harsh weather.
- Inspect gas connections periodically.
- Seal natural stone surfaces when recommended.
- Remove leaves and debris from drainage areas.
- Store cushions indoors during extended periods of rain.
Preventive maintenance extends the life of both appliances and building materials.
Why Outdoor Kitchens Continue to Grow in Popularity
Outdoor living has become one of the most significant home design trends in recent years. Homeowners increasingly view their backyards as extensions of their indoor living spaces rather than separate areas.
An outdoor kitchen offers numerous benefits:
- Encourages more family time
- Makes entertaining easier
- Increases usable living space
- Enhances property appeal
- Supports healthier outdoor lifestyles
- Creates memorable gathering spaces
Whether hosting neighborhood barbecues or enjoying quiet dinners under the stars, outdoor kitchens make everyday living more enjoyable.
Conclusion
Exploring easy outdoor kitchen ideas proves that creating a beautiful backyard cooking space doesn’t require an unlimited budget or extensive construction. By focusing on smart layouts, durable materials, practical storage, comfortable seating, and efficient cooking equipment, you can design an outdoor kitchen that perfectly matches your lifestyle. Start with the essentials, plan for future upgrades, and choose weather-resistant features that will provide years of enjoyment. With thoughtful planning and creative design, your backyard can become the ideal place for cooking, dining, entertaining, and making lasting memories with family and friends.


Peter Orszag Hair: Hairstyle, Hairline, Rumors, and What We Know in 2026

Matt Danzeisen: Biography, Career, Family, Marriage, and Life in 2026

DreamMeaniing.com USA: Dream Meanings, Symbols, Interpretation, and What You Should Know in 2026

Essential Skills Necessary to Have as a Bookkeeper

Wendy Edgar-Jones: The Film Editor, Mother of Daisy Edgar-Jones, and Her Career Behind the Camera

Ways to Monitor Both Stocks and Digital Assets in One Place
-
 Business4 months ago
Essential Skills Necessary to Have as a Bookkeeper
-
 Celebrity4 months ago
Wendy Edgar-Jones: The Film Editor, Mother of Daisy Edgar-Jones, and Her Career Behind the Camera
-
 Business4 months ago
Ways to Monitor Both Stocks and Digital Assets in One Place
-
 Business4 months ago
Easy Outdoor Kitchen Ideas
-

 Business4 months ago
The “Face” Crisis: Will Seedance AI Lose Its Best Creators
-

 Celebrity4 months ago
Jarnette Olsen: The Woman Behind the Success of the Olsen Family
-

 Blog3 months ago
FeedBuzzard Advertise: The Complete 2026 Guide to Smarter Digital Advertising and Better Campaign Performance
-

 Tech4 months ago
Ponas Robotas: The Complete Guide to the Groundbreaking Cyber Thriller Series